How to back up Android and keep your data safe
Backups are indispensable. Whether it's a backup of your Android smartphone, your photo albums or your laptop PC, backups come in at just the right moment to save the day. There is nothing worse than losing everything on your phone or computer and realizing you never backed anything up. So here are a few methods for making an Android backup.
Google backup
As you probably know, Google is more than willing to help keep all your apps and data safe. If you go into your phone's settings, you'll find a section called Backup & Reset. In here you'll find an option for backing up your data, including Wi-Fi passwords, preferences and app data. All of this will be tied to your Google account, which you can set to automatically restore when you re-install an app.
App backup (for non-rooted phones)
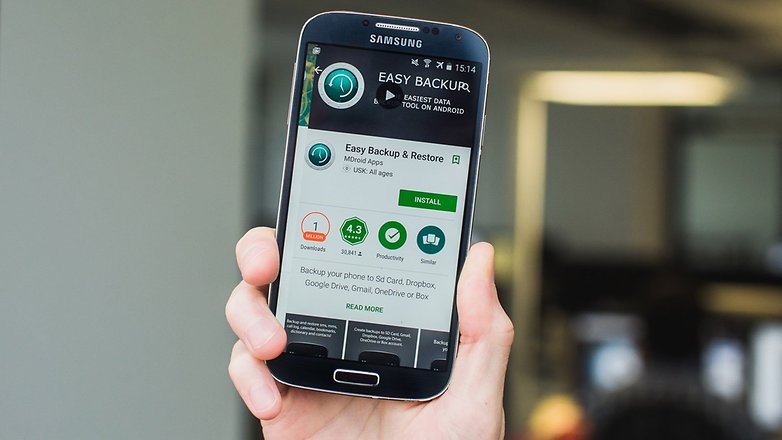
There are plenty of useful backup solutions in the Play Store. Some for specific purposes like backing up your text messages and others for an all-in-one backup. Easy Backup & Restore is a free app that lets you back up your contacts, call logs, text messages, calendars and bookmarks.
Easy Backup doesn't back up your photos, music, videos or documents. These are very easy to back up yourself though using a USB cable and your computer: just locate the appropriate folders on your phone in a Windows Explorer window and copy and paste the contents to your computer.
How to back up everything on Android with Easy Backup & Restore

- Download Easy Backup on your Android device.
- When you launch the app, you'll be asked if you want to create a backup. Tap Yes.
- You'll then see a bunch of check boxes next to the things you can back up: SMS, MMS, call logs, calendar, bookmarks, dictionary and contacts. Make your selections and tap OK.
- You'll be asked for a save location for your backup. Make your selection and tap it.
- If you select a cloud service you'll have to sign in. If you select SD card you'll have to confirm the directory.
- You'll then be asked to give the backup a file name. The date and time is the default. If you have multiple devices you might want to modify the file name to include the device you're backing up.
- You'll then see a progress page when your data is being backed up. Once completed, you'll get a pop up window with a summary of what was backed up.
- If your phone is rooted, you can also back up your apps and app data. If not, you can still tap on the Apps Tools tab in the main menu and create a backup of the APKs on your phone. APKs are like an .exe on a computer: it's the program or app package. If your Google settings are enabled to back up your app data and settings (outlined above) you can use this option to back up the apps themselves and Google's backup to save the settings and data in the apps.
- Just check the boxes next to the apps you want to save and hit Backup at the bottom.
- When you want to restore your apps or data, just hit the Restore tab. You'll be prompted to set Easy backup as the default SMS app. You can change this back once your backup has been restored.
- Select the backup you want to restore and tap it. You'll see a pop up with details of what will be restored. Tap OK and you're done.
- Restoring your apps is slightly different. Go back to Apps Tools in the main menu and tap the Archived tab.
- You can check off the APKs you want to restore, then tap Install at the bottom.
- You'll then see the permissions screen for each app, like you would with any new app you install.
App backup (for rooted phones)
If your phone is rooted then there is no better backup solution than Titanium Backup. Titanium Backup lets you back up absolutely everything on your phone. The complete backup can be restored at any time and you can set up scheduled backups so you have a regular snapshot of your Android phone's contents.
Backups can be performed without even closing the apps you're currently using and they can be saved as flashable zips. Titanium also lets you transfer files between the SD card and your phone with the utmost ease.
How to back up everything on Android with Titanium Backup
- Download the Titanium Backup app on your rooted Android.
- Start the app and grant it root privileges. You'll be asked to read some disclaimers and so on (this is a good idea).
- You need to have USB Debugging enabled on your phone.
- In Titanium you'll see three tabs. One is an Overview tab with information on your device, the second is Backup/Restore where all the fun stuff takes place and the third is for scheduling regular backups.
- Go to the Backup and Restore tab. You'll see a list of your phone's contents along with icons that indicate whether or not they have been backed up. Triangular warning signs mean you have no backup and smiley faces are pretty self explanatory.
- If you want to back up your system data or apps, tap the little document with a check mark on it at the top. This will take you to the batch actions list.
- You can then tap Run next to whatever action you want completed. If you want to back up your apps, tap Run next to Backup all User Apps and if you want to back up your system data tap Run next to Backup all System Data.
- Titanium will then go through the process of creating your backup. This may take a while.
- Once completed, your backup will be labeled with the date and saved. You can also create an update.zip file to be flashed through recovery if you like, or you can restore through Titanium itself.
- To restore in Titanium, just go to the Batch Actions screen again and scroll down. You'll see options under the Restore setting for the actions you completed earlier: in this case, Restore all apps with data and Restore all system data.
- Tap Run next to the actions you want to restore.
- 12. You'll then have the option to restore everything you backed up or just some sections of it. Make your choices and tap the green check mark in the top right-hand corner.
PC backup
Helium is a great tool for creating a complete backup without root access. You install the Helium app on your phone, grab the desktop version as well and pair the two. Once you've made the connection, you can do Titanium-like backups without needing root access. You simply tell Helium which apps and data you want to back up and away it goes. The Pro version lets you schedule automatic backups and store your backups in the cloud.
How to install Helium on Android and PC

- Download the Helium app on your Android.
- Install Helium on your PC.
- Connect your Android to your PC with a USB cable.
- Enable USB Debugging on your Android.
- You might be asked to switch your USB connection type to PTP (camera mode).
- You'll be prompted to accept your computer's RSA key.
- You'll see a green check mark in the Helium window on your PC, letting you know that the connection has been made and Helium backups are now enabled.
- You'll see the same message on your Android. You can now disconnect your Android from your PC.
- Note that if you turn your Android off you'll need to reestablish the connection between Helium on your phone and on your PC.
How to backup Android with Helium
- On your Android you'll see you have two tabs in Helium: Backup and Restore & Sync. The first tab lets you choose which apps you want to back up by placing a check mark next to them.
- If you want to save all your apps, swipe up from the bottom of the screen. You will see a summary of your backup choices as well as the option to Select All.
- You can choose to backup everything (apps and data) or just the data (which is faster). In the latter case, if you restore your backup at a later date you'll simply have to manually reinstall your apps. Note that there are some apps Helium can't back up. They are listed at the bottom.
- The slide up window is also where you hit the Backup button. When you hit Backup you will be asked where you want to save your backup: internal or external storage or a cloud service (Pro version only).
- In the Restore and Sync tab you can connect a cloud service for storing and accessing your backups. You can also access saved backups on your internal memory or connect with your other devices.
- When you make your selection you may be prompted to ensure you have no password set for full backups, or to enter your device's PIN or password if you are encrypted. Once you've done this the backup will complete.
- When it comes time to restore your backup, simply open the Restore & Sync tab and locate your backup. You can also connect to the Helium sever for PC downloads.
PC backup for dummies
If all of this sounds way too complicated, simply connect your Android phone to your PC with a USB cable, open a Windows Explorer window and navigate to your phone. Here you will see a bunch of folders including photos, videos, music and documents.
Just go into each folder and copy paste the stuff you want to save onto your computer for safekeeping. This is a pretty handy thing to do even if you have other backup solutions at hand, because there's no such thing as too many backups.